Introduction
Windows 7 is the latest addition to Windows based operating system and is being considered as much faster, safer and better then its predecessor Vista. Most of the Windows users are feeling satisfied after upgrading there systems to Windows 7 which is fuelling the rapid popularity and adoption of the operating system around the globe. Apart from features such as DirectAccess, VPN Reconnect, Multi touch to name a few and benefits such as greater speed, longer battery life, etc., Windows 7 also possess virtual Wi-Fi capability.
This virtual Wi-Fi capability is the key to new and enhanced wireless experience for a Windows 7 user because with this capability, a Windows 7 notebook with a plugged or embedded Wi-Fi adapter can be converted into a Wi-Fi router/Access Point. Such a Wi-Fi router is popularly termed as SoftAP, in short for software Access Point. Also, the same Wi-Fi adapter which is used to host the SoftAP, can be simultaneously be used as Wi-Fi client to connect to regular Wi-Fi networks.
Virtual Wi-Fi capability basics
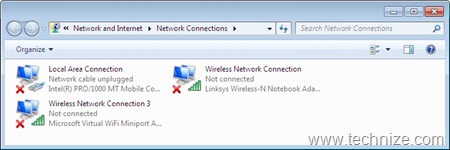
Virtual Wi-Fi capability essentially installs a virtual device corresponding to a Windows 7 certified Wi-Fi adapter present on a Windows 7 machine. This device is shown up as a separate network connection in the “Network Connections Folder” with device name as ‘Microsoft Virtual WiFi Miniport adapter’ as shown in the Figure 1. SoftAP is started on this virtual device and the lifetime of this device is tied to its corresponding to physical Wi-Fi adapter. The network connection corresponding to physical Wi-Fi adapter can be used to make regular Wi-Fi connections to various Wi-Fi networks.
Windows 7 based software Wi-Fi router functions similarly like any physical Access Point available from the market. Once up and running, a Wi-Fi network is established around your notebook to which various Wi-Fi devices/users can connect to share/access/offer various resources/services. Such a network is commonly termed as Wi-Fi Personal Area Network (PAN) as it basically belongs to an individual person.

Wi-Fi Personal Area Network
Wi-Fi based PANs are progressively becoming the preferred choice to setup wireless PANs among masses. There are mainly two basic reasons behind this:
· Firstly, Wi-Fi PAN can be setup at any convenient location and is relatively simpler than fixed and complex corporate Wi-Fi networks. Further, they provide bandwidth and range similar to any regular Wi-Fi network which is much greater than present time popular PAN technologies such as Bluetooth and Infrared.
· Secondly, most of the consumer electronic (CE) devices that are being manufactured nowadays such as digital cameras, digital projectors, printers, game consoles, HDTV, J&R plasma TV and digital photo frames etc. are Wi-Fi capable. Wi-Fi capability until recent times was limited to devices such as notebooks, smart phones, PDAs, etc. Wi-Fi capable CE device provides the opportunity to explore innovative usage models as these can offer services, share and access data at high data rater from large distances wirelessly.
Before the release of Windows 7, there were two methods to set up a Wi-Fi Personal Area Network. First method requires user to own a physical Wi-Fi router and accomplish the task of configuring this router according to need. Second method requires user to put his notebook Wi-Fi adapter into a special ad-hoc mode through Windows Wi-Fi utility. Ad-hoc mode is not the regular mode (Infrastructure mode) in which Wi-Fi users connect to their corporate Wi-Fi network or a hotspot.
Wi-Fi PAN based on virtual Wi-Fi
However, virtual Wi-Fi capability of Windows 7 provides user, an easier and better way to setup a Wi-Fi PAN around his notebook. Justification to this can be done from some of the key distinguishers for this capability that are listed below:
· No need to carry a physical Wi-Fi router and its power cord which is must for Wi-Fi PANs hosted on separate Wi-Fi router device. One’s notebook itself becomes Wi-Fi router.
· No need to go through Access Point configuration screens while setting a physical Access Point based Wi-Fi PAN. Thus, user is not needed to arrange for network cables and understand the complex configuration screens. Configuring a Windows 7 softAP is easily understandable as it does not contain options which are unnecessary from a PAN’s perspective.
· No need to switch the mode of your Wi-Fi adapter which was the case with ad-hoc mode Wi-Fi PAN.
· Availability of latest Wi-Fi security mechanism that is WPA2, which is not available with ad-hoc mode Wi-Fi PAN.
· Central control and management of Wi-Fi PAN which was not the case with ad-hoc mode Wi-Fi PAN.
· Wi-Fi adapter can simultaneously act as regular Wi-Fi client (to connect a particular Wi-Fi network) and can host a softAP to set up Wi-Fi PAN, both at the same time. This is impossible with ad-hoc mode Wi-Fi PAN.
Setting up Wi-Fi PAN using virtual Wi-Fi capability
Understanding the new Windows 7 virtual Wi-Fi capability and its key distinguishers over other techniques, let’s have a look how to use this capability to start a SoftAP on your notebook to setup a Wi-Fi PAN. Two ways are presented here to accomplish this. It is assumed that in both the ways, you have Windows 7 certified adapter on your machine.
1) Using Command line Interface: Run cmd.exe with administrator privileges to open the command line interface. After this, one has to type certain commands to accomplish following tasks related to softAP:
a) Configuring the SoftAP: Type following command to achieve this:
“netsh wlan set hostednetwork mode=allow “ssid=<ssid>” “key=<passphrase>” KeyUsage=persistent/temporary”
Replace, <ssid> with the actual ssid (network name) for your Wi-Fi PAN.
<passphrase> with the actual password (WPA2 Key, can be a string with 8 to 63 ASCII characters) for your Wi-Fi PAN.
The option “KeyUsage” specifies whether the same key is to be used when a softAP is restarted. KeyUsage=persistent will keep the key intact and the same is by default if you don’t specify KeyUsage
On hitting the <Enter> after this command, one will see series messages as shown in the Figure 2, confirming the configuration of softAP. At this stage, the softAP is not started. If you are not able to see the virtual device (Microsoft Virtual WiFi Miniport adapter) in “Network Connections Folder”, you will see the one with after typing this command with status as “Not connected” (Figure 1).
b) Starting the SoftAP: After the necessary configuration, softAP can be started with following command (Figure 3). The corresponding virtual device will come in connected state (Figure 4):
netsh wlan start hostednetwork
c) Stopping the SoftAP: softAP can be stopped on typing the following command on command line interface (Figure 5):
netsh wlan stop hostednetwork
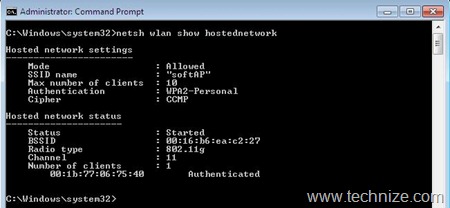
d) Details/Status of SoftAP: Various details and status of a configured softAP can be seen using the following command (Figure 6):
netsh wlan show hostednetwork


2) Using Software Utilities: If you don’t want to use the command line interface, few software utilities are also present for managing Windows 7 softAP. One of most popular and freely downloadable from the web is Connectify.
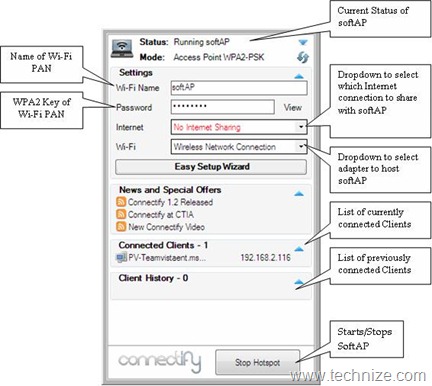
After downloading and installing the Connectify with administrator privileges, one can see the Connectify UI as shown in Figure 7, which also explains various options on its User Interface related to softAP management.

As can be seen, it is very simple to start a softAP on your Windows 7 notebook. Once started, a Wi-Fi PAN will be created around your network. This Wi-Fi PAN can be used to sync your Wi-Fi devices such as smart phones, digital cameras etc. with your notebook. Also, the PAN will allow you to share the internet/network access you have on your notebook (either through a cellular/WiMax/Wi-Fi means) with other Wi-Fi devices/users that will connect to PAN. This can be of great advantage in many instances such as, while traveling only one person has internet access and he wants to share that with fellow travelers. Also, Wi-Fi PAN will allow better usage of CE devices such as you can watch and enjoy the content available on your notebook on your Wi-Fi capable HDTV wirelessly. There is long list of such usages that will keep growing with increasing popularity of Wi-Fi PANs that has already reached to next level with Windows 7 Wi-Fi capability.
This is a guest post from Ajay Kumar Gupta who is a frequent contributor to some leading security magazines” Some of his recently published articles are:
Security Risk Exposure Increases due to Windows 7 Virtual Wi-Fi Capability
Top reasons why corporate Wi-Fi clients connect to unauthorized networks
Comments
3 responses to “New Wireless Experience with Windows 7”
Connectify is a very good and easy tool to use but i have experienced a problem with it. once you start Hotspot in it, you cant stop the service in your pc. Your wifi card remains in transmit mode even if you disable it with button available on your laptop. I had to restart my laptop to stop the hotspot.
Wow, that worked like a charm…
Connectify Brother!
I used command line. But I can´t connect with my cellphone. I don’t know if I must configure my cellphone apart from providing a user name and password. The cellphone detects the red but when I try to connect it, it remains unsuccessfully trying to connect and no error message appears on the screen of the cellphone.
Help me, please! Thanks