Sometimes we tend to forget the things which we consider very small and unimportant. And this forgetfulness grows with the use of technology. As our knowledge grows, instead of keeping all of it in our mind, we tend to store some information in our computers, some of it is stored in our calendars, emails, to do lists etc. And even then, most of the times the techie people forget where to look for what :-).
Today I went to a client to install one of their time, attendance and security systems, I had to first install Windows XP there and then get it configured with the network. Now the problem came when the computer started and it went to the logon screen. The in-charge there was keen to make everything auto-function.
And surprisingly, even this is a very small setting, I couldn’t do it in first go. And then when I did it, I decided to write about it. So there are the three methods which you can use for changing the setting for auto logon in Windows XP.
1- Using the Control Panel
This is the safest one as it uses default Windows GUI to alter the settings.
Just go to Start –> Run –>
control userpasswords2

Uncheck the check box if you want to automatically logon using one of the usernames.
Otherwise keep it checked if you want to keep the password protection on.
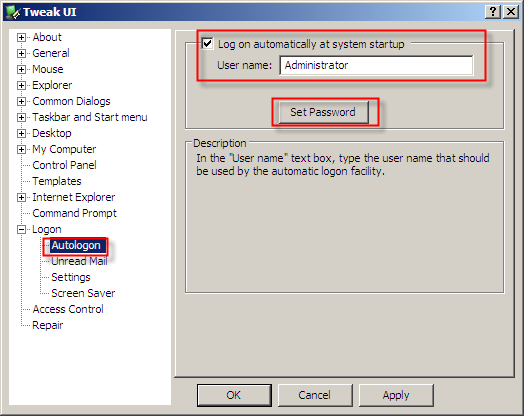
2- Using TweakUI
The other method is to use Windows XP power toys tool, TweakUI. You can download it from here.
Open TweakUI –> Logon –> Autologon
There you can configure whether you want to auto logon of you want to have password protected computer access.
3- Using the registry
This is the most complex one as you have to alter the registry to make it working. I would recommend that you backup the registry before altering it.
Here is the Microsoft approach to editing the registry for auto logon:
1. Click Start, click Run, type regedit, and then click OK.
2. Locate the following registry key:
HKEY_LOCAL_MACHINESOFTWAREMicrosoftWindowsNTCurrentVersionWinlogon
3. Using your account name and password, double-click the DefaultUserName entry, type your user name, and then click OK.
4. Double-click the DefaultPassword entry, type your password under the value data box, and then click OK.
If there is no DefaultPassword value, create the value. To do this, follow these steps:
a. In Registry Editor, click Edit, click New, and then click String Value.
b. Type DefaultPassword as the value name, and then press ENTER.
c. Double-click the newly created key, and then type your password in the Value Data box.
If no DefaultPassword string is specified, Windows XP automatically changes the value of the AutoAdminLogon registry key from 1 (true) to 0 (false) to turn off the AutoAdminLogon feature.
5. Double-click the AutoAdminLogon entry, type 1 in the Value Data box, and then click OK.
If there is no AutoAdminLogon entry, create the entry. To do this, follow these steps:
a. In Registry Editor, click Edit, click New, and then click String Value.
b. Type AutoAdminLogon as the value name, and then press ENTER.
c. Double-click the newly created key, and then type 1 in the Value Data box.
6. Quit Registry Editor.
7. Click Start, click Restart, and then click OK.
Comments
4 responses to “Auto logon in Windows XP”
test
tt
hh
Good Work